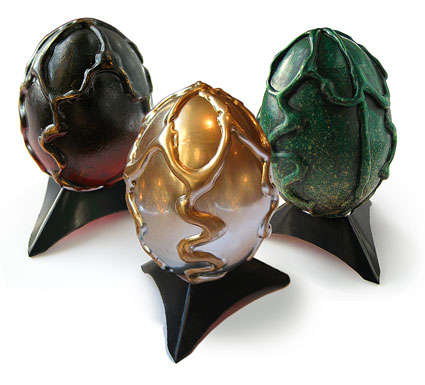
Dragon Eggs
That’s it, it couldn’t really be simpler than that!
What you’ll need:
- One hen’s egg (free range) (or larger egg if you have it, duck, goose or even ostrich)
- Glue gun and a small amount of hot melt glue
- Spray paint, any colour will do, but black, red, green, gold or silver are the best
- a little bit of acrylic paint, for the distressing (black or dark brown)
When you’ve done, why not have a look at dadcando, where you’ll find free downloadable printables for an Egg Stand and Antique Egg Mailing box.
It’s a great project for Easter, or any other time of year when Dragon Eggs are in season.

step 1Make a hole in either end of the egg
Please use free range if you can… help chickens have a better life. Don’t worry about the waste, There doesn’t have to be any. Once you have blown the eggs, you can always make scramble or an omelet from the contents of the egg.
So, first off, wash the egg quickly in cold, slightly soapy water. In a minute you are going to be putting your lips to that egg surface and you know the last place that egg was !!
Now, to making the hole; strangely, this is not as easy as it sounds. For those of you with Dremmels, or miniature drills, (or dentists even) then this should present no problem, but for mere mortals, the egg is surprisingly hard, and being… well, an egg shell, is also quite brittle.
To make the hole you get a very sharp craft knife. Put the point of the tip of the blade against the tip of the egg at one end and turn back and forth about 180 degrees each turn. You’ll find it seems to take ages to get started. Don’t be tempted to push to hard or you will break the egg. If you feel that you are not getting started, then carefully scratch a cross at the end and put the tip of the blade at the centre of the cross and go back to turning it back and forth.
Once you break through the going gets easier, but you still have to take care as the blade can bite in and chip or crack the egg. If you are patient (only 5 minutes or so of turning) then within a few minutes you will have a hole about the size of a drinking straw. In fact you are aiming for a hole, the diameter of anything between a cocktail stick and drinking straw. Don’t worry if you do chip a little bit away, you will be covering that up with hotmelt in due course.
Make a hole like this IN BOTH ENDS.


step 2Blow the egg
The whole blowing part is a good job to get the kids to do (a bit of at least), anything from about 8 -9 years old or onwards should be fine.
Collect the white and yolk in a suitable bowl or jug, and save for later conversion into scramble or an omelet (probably best if you do this the same day and once you have blown all over the egg yolk and white, I’m not sure how long it will keep). Also (not to be gross, but) all that blow / spittle that you might have got into the mix as a byproduct of all that blowing, might preclude the serving of said scramble to guests outside the immediate family!
Once all the egg white and yolk is (rather cathartically) evacuated, run the egg under the cold tap to clean out the inside as much as possible. If you can, it might be worth filling your mouth with water and blowing that through the egg. You don’t want it getting smelly. I have to say that I have never had an egg prepared like this go bad.

step 3Attach a cocktail stick to the egg
Put some hot melt on the end of a cocktail stick and gently push it into the egg at one end so that most of it sticks out. Hold it till it is set and add a little bit of hot melt, glue gun glue on the outside if necessary.
You must still handle the egg with care, but this simple handle will make all the difference.

step 4Draw hot melt features on the egg
So, instead of painting the egg right away, draw some features on it with the hot melt glue gun. Of course you can do any pattern you like. In fact variety and invention is the key to making your dragon’s egg a real original. (As you can see one of the comments is that you could also make an Alien’s Egg, now how cool would that be… mmm might try that ).
But in case you want to practice before you branch out, here’s how I did it.
First: I drew loops round the upper half of the egg, while rotating it.
Second: I joined the tops of these loops to the top tip of the egg with more or less straight lines
Third: I joined the bottom of each of the loops to the bottom tip of the egg (right by the cocktail stick) with wavy lines.


step 5Spray the Dragon’s Egg
I have a number of old cans of spray paint and so I chose black (with a red glow at the bottom), half and half gold and silver, and a really rich green.
If you don’t have spray paint then any water proof paint will do, household emulsion (called Latex paint in the US), or even nail varnish, (ASK THE OWNER of the nail varnish first, that stuff can be expensive!)
You could try almost any colour. I believe that Dragon’s Eggs of almost any real colour have been described and I’m sure there are a few out there with imaginary colours!
Use the edge of a corrugated cardboard box, the prong in the middle of the egg box, some flower arranging foam, or a large bit of Blu Tak to pop the other end of the cocktail stick in to hold the egg while it dries. (how easy is that?!)

step 6Distress the Dragon’s Egg
Like all distressing, all you have to do is paint a bit of grime on and wipe it off so that it goes in all the crevices, which of course you have just made using the glue gun.
Paint on black acrylic paint (or other contrasting colour) and then while it is still wet, wipe it off.


step 7Add surface highlights


step 8Cut off cocktail stick handle
Either use a strong pair of kitchen scissors or better still a pair of wire cutters (blades meet rather than shear).
Do not rest the Dragon’s Egg on anything and use force that could translate to the Dragon’s Egg itself, when cutting off the stick.
If you want you could place the cocktail stick in a vice and hacksaw it through carefully.

step 9Admire you Dragon’s Egg
Whilst you’re at it why not have a look at the Antique Mailing Box, which you can make to keep your Dragon’s Egg safe, and pretend that you got it from a far off land.
Whatever you do, have fun making this project. I think it will make the most original and exciting Easter gift for someone dear.


